
There are many ways to print on wood. Whether it is cafe planters or cafe barrier wooden panels, usually we offer four types of printing which is very Dependant on the artwork provided.
In this blog we’re primarily looking at how to stencil a logo or artwork on to our wooden cafe barrier panels or planters.
Many Graffiti artists tend to use stencils. Some of the more famous ones are, of course, Banksy, and Blek le Rat . This is primarily because applying stencils is quick and they allow the artist to produce the artwork and leave almost instantly. Stencil graffiti is a form of graffiti that makes use of stencils made out of various media to create art that can be replicated easily. The design is cut out of the media and then the image is transferred to a surface through the use of roll-on paint or spray paint.
The advantages of using a stencil are:
a) Low cost set up.
b) Crisp images.
c) UV Stable. (Dependant on the sprays or paints)
d) Does not damage the sub material.
e) The quantity manufactured does not usually affect the price.
The disadvantages are:
1. Designs can be limited.
2. Colours can also limited.
Brandline products recommend using stencils for simple logos or messages. Just in case you fancy taking on the stencil yourself, we have listed a step by step instruction.
In order to stencil a logo or message on a wooden panel, the following process is undertaken.
Ensure the surface is free from dust, and is smooth, clean and flat.
A light sanding is perfect if you can apply a clear coating to protect both the print and the timber once set in location.
Manufacture the stencil.
Using as light weight a vinyl as possible, manufacture the stencil. Now, nearly all vinyl comes with an adhesive backing on it. The adhesive backing is rated as to the adhesion strength. We use a standard, medium-tac vinyl, which, once we have agreed the artwork with the client, we cut to shape. To do this we use a digital vinyl sign cutter which is powered by a digitally controlled servo system and an accu-alignment system. This ensures it allows for precise contour cutting by detecting the registration marks. However, don’t panic, for this process, our vinyl cutter is a little over kill! A standard vinyl cutter is absolutely fine. Once the vinyl has been cut, and you have picked all the parts you don’t need, you can apply the application film to it. The application film is a clear film that you apply to the face of the vinyl which allows you to remove the adhesive backing of the vinyl. You need to do research here. Make sure the application adhesive is slightly stronger than the backing adhesive, but not strong enough to spoil the seal between the vinyl and the timber.
Apply the vinyl to the timber.
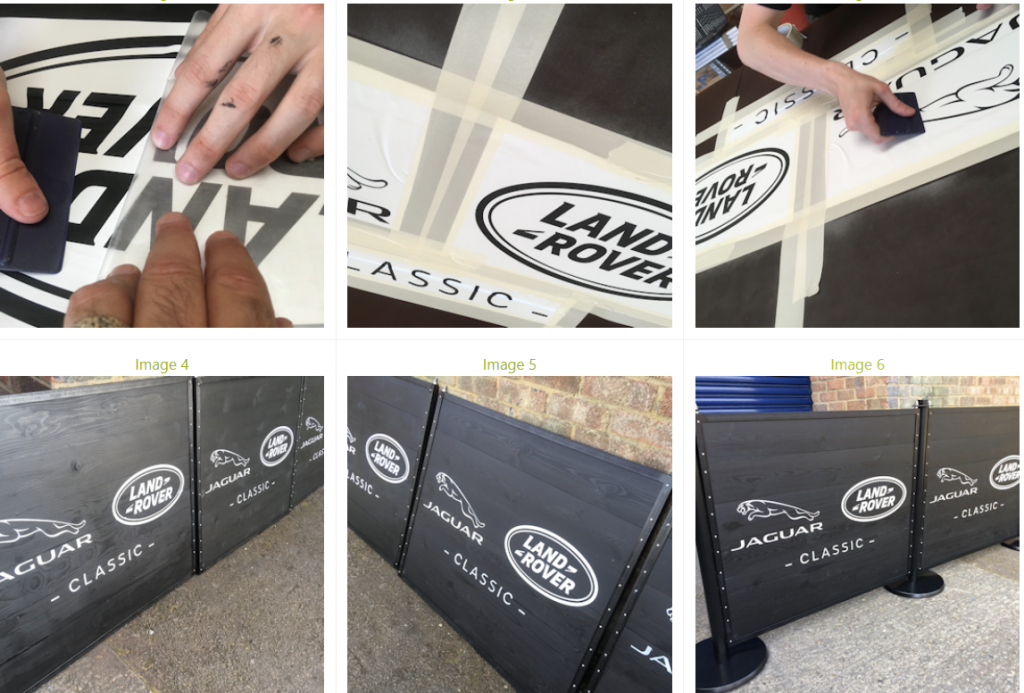
Once the vinyl backing is removed, you can apply the finished stencil to the timber. Ensure that the stencil is applied fully and remove the application film slowly. (See image 1) Pull the application film back on itself to gradually roll it off whilst using a squeegee, pushing the vinyl on to the timber.
Masking.
Mask off the uncovered parts that you do not want any over-spray to be on. (See image 2 and 3).
Spraying.
Now the fun part! Using a spray paint of the required colour, just a rattle can will do, spray the stencil from above. Remember the further away you keep the spray nozzle. the better. A thin coat will allow you to apply several coats over a short time. Do not use too much spray. This will cause runs.
Removal of Stencil and Masking.
Once you have sprayed the stencil, be patient. Wait a few minutes and then remove the stencil and the masking you have used. You may have to touch up the artwork at this point. (See image 4 & 5)
Coat the timber.
A good external clear coat will provide extra protection. (See image 6)
Repeat as necessary!


